elastic-beanstalk-app
Deploy with Terraform and AWS Elastic Beanstalk
![]()
![]()
![]()
![]()
![]()
![]()
![]()
Getting Started with the Sources
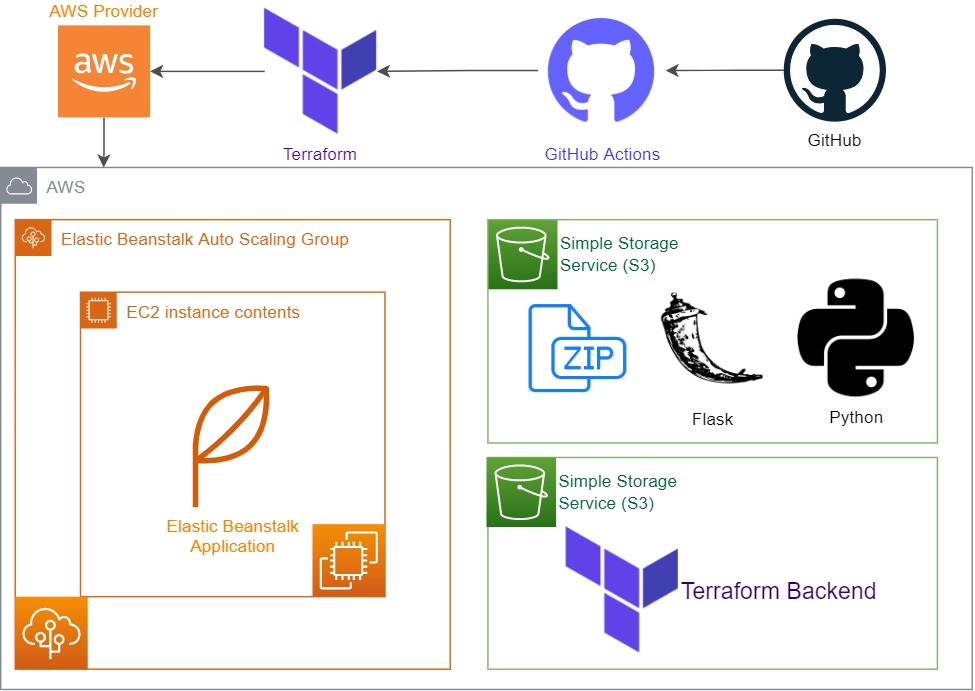
Terraform is a tool for building and managing infrastructure as code. It is a declarative, programmatic, and portable way to create, destroy, and update infrastructure.
It helps us to define S3 Buckets, IAM Roles, EC2 Instances, and more. We use S3 Buckets to store our application code files. And we use IAM Roles to give permissions to our EC2 Instances.
Elastic Beanstalk is a service that makes it easy to deploy, manage, and scale applications on Amazon’s Elastic Cloud Compute Service.
Elastic Beanstalk creates the application environment with code stored in S3 buckets and makes it run on EC2 instances as application environments.
- You need to create an IAM role for the application. You can create an IAM role by following the instructions in the AWS IAM Roles section of the AWS IAM User Guide. IAM roles are used to authorize Terraform’s operations. IAM role you create for this operations should have the S3, EC2, Elastic Beanstalk permissions.
After you create IAM user and policy you need to get its access key and secret key. And define them in GitHub Secrets as the environment variables. Replace your access key and secret key with your own access key and secret key with the following format:
AWS_ACCESS_KEY_ID
AWS_SECRET_ACCESS_KEY
- Your Elastic Beanstalk resources must have globally unique names.
Trigger your Terraform deployment with GitHub Actions
When you create GitHub Action workflow, you can run Terraform Apply and Terraform Destroy stages automatically by pushing your code to GitHub repository. You can seperate stages with adding the following commands to your GitHub Action workflow:
You will be able to run terraform apply command when you push your code to the main branch:
- name: Terraform Apply
  if: github.ref == 'refs/heads/main'
  id: apply
  run: terraform apply
You will be able to run terraform destroy command when you push your code to the destroy branch:
- name: Terraform destroy
  if: github.ref == 'refs/heads/destroy'
  id: destroy
  run: terraform destroy
Store your Terraform state in S3 Bucket
You need store your Terraform state in S3 bucket that you created previously. S3 bucket details are defined in the backend.tfvars file under the prod directory. You can change the bucket name and region by editing the backend.tfvars file.
bucket = "enes-mybucket"
key    = "path/to/my/key"
region = "us-east-2"
Storing your Terraform state in S3 bucket helps you to manage your Terraform operations. For example, you can backup your Terraform state before you destroy your infrastructure. And you can destroy your whole infrastructure when you need to. So when you try to destroy your infrastructure, Terraform will check if the state file exists in the S3 bucket. If the state file exists, Terraform will destroy your infrastructure that you created before with Terraform Apply command (Even if you build your infrastructure automatically committing with GitHub Actions).
Check the AWS S3 documentation for more information.
Define Solution Stack
You need to define your application version number and platform operating system version number on AWS that you want to use for deployment under aws_elastic_beanstalk_environment source section in main Terraform file called eb_app.tf in this project.
- Deployment fails in Terraform stages when you type a value for
solution_stack_nameif it is not valid or not supported in Amazon Web Services (AWS).
solution_stack_name = "64bit Amazon Linux 2 v3.3.11 running Python 3.8"
description         = "environment for flask app"
Getting Started with Terraform
HashiCorp Terraform is an infrastructure as code tool that lets you define both cloud and on-prem resources in human-readable configuration files that you can version, reuse, and share. You can then use a consistent workflow to provision and manage all of your infrastructure throughout its lifecycle. Terraform can manage low-level components like compute, storage, and networking resources, as well as high-level components like DNS entries and SaaS features. Terraform creates and manages resources on cloud platforms and other services through their application programming interfaces (APIs). Providers enable Terraform to work with virtually any platform or service with an accessible API.
Check out the Terraform Documentation for more information.
Getting Started with AWS Elastic Beanstalk
Amazon Web Services (AWS) comprises over one hundred services, each of which exposes an area of functionality. While the variety of services offers flexibility for how you want to manage your AWS infrastructure, it can be challenging to figure out which services to use and how to provision them.
With Elastic Beanstalk, you can quickly deploy and manage applications in the AWS Cloud without having to learn about the infrastructure that runs those applications. Elastic Beanstalk reduces management complexity without restricting choice or control. You simply upload your application, and Elastic Beanstalk automatically handles the details of capacity provisioning, load balancing, scaling, and application health monitoring.
Elastic Beanstalk supports applications developed in Go, Java, .NET, Node.js, PHP, Python, and Ruby. When you deploy your application, Elastic Beanstalk builds the selected supported platform version and provisions one or more AWS resources, such as Amazon EC2 instances, to run your application.
You can interact with Elastic Beanstalk by using the Elastic Beanstalk console, the AWS Command Line Interface (AWS CLI), or eb, a high-level CLI designed specifically for Elastic Beanstalk.
Check out the AWS Elastic Beanstalk documentation for more information.
Getting started with GitHub Actions
GitHub Actions is a continuous integration and continuous delivery (CI/CD) platform that allows you to automate your build, test, and deployment pipeline. You can create workflows that build and test every pull request to your repository, or deploy merged pull requests to production.
GitHub Actions goes beyond just DevOps and lets you run workflows when other events happen in your repository. For example, you can run a workflow to automatically add the appropriate labels whenever someone creates a new issue in your repository.
GitHub provides Linux, Windows, and macOS virtual machines to run your workflows, or you can host your own self-hosted runners in your own data center or cloud infrastructure.
Check out the GitHub Actions Documentation for more information.
Output:
.png)
.png)
.png)
.png)